文章摘要
- MCP 和 Spring AI相关文档
- 开发一个Spring天气应用,并发布为MCP Server.
- 开发一个Spring应用作为MCP Client调用自己的MCP Server服务,并获取天气信息.
什么是MCP?
文档: https://modelcontextprotocol.io/
MCP 是一种开放协议,它标准化了应用程序如何向 LLM 提供上下文。将 MCP 想象成用于 AI 应用程序的 USB-C 端口。正如 USB-C 提供了一种将设备连接到各种外围设备和配件的标准化方式一样,MCP 也提供了一种将 AI 模型连接到不同数据源(例如本地文件、数据库或内容存储库)和工具(例如 GitHub、Google Maps 或 Puppeteer)的标准化方式。
Spring AI MCP
文档: https://docs.spring.io/spring-ai/reference/api/mcp/mcp-overview.html
构建服务端MCP Server
引入依赖
1
2
3
4
5
6
7
8
9
10
11
| <dependencyManagement>
<dependencies>
<dependency>
<groupId>org.springframework.ai</groupId>
<artifactId>spring-ai-bom</artifactId>
<version>1.0.0</version>
<type>pom</type>
<scope>import</scope>
</dependency>
</dependencies>
</dependencyManagement>
|
1
2
3
4
| <dependency>
<groupId>org.springframework.ai</groupId>
<artifactId>spring-ai-starter-mcp-server-webmvc</artifactId>
</dependency>
|
application.yml配置
1
2
3
4
5
6
7
8
9
10
11
12
| spring:
application:
name: mcp-server
ai:
mcp:
server:
enabled: true
name: my-weather-and-ip-mcp-server
type: SYNC
instructions: 这里是mcp介绍
server:
port: 8888
|
1
2
3
4
5
6
7
8
9
10
11
12
13
14
15
16
17
18
19
20
21
22
23
24
25
26
27
28
29
30
31
| package org.example.mcpserver;
import com.fasterxml.jackson.core.JsonProcessingException;
import com.fasterxml.jackson.databind.ObjectMapper;
import org.springframework.ai.tool.annotation.Tool;
import org.springframework.ai.tool.annotation.ToolParam;
import org.springframework.stereotype.Service;
import org.springframework.web.client.RestClient;
import java.net.URI;
import java.util.Map;
@Service
public class WeatherService {
@Tool(description = "根据城市名获取天气信息")
String getCurrentWeather(@ToolParam(description = "城市名") String cityName) {
System.err.printf("准备查询【%s】天气预报%n", cityName);
RestClient client = RestClient.create(URI.create("https://api.vvhan.com"));
Map<?, ?> result = client.get()
.uri("/api/weather?city={0}", cityName)
.retrieve()
.body(Map.class);
try {
return new ObjectMapper().writeValueAsString(result);
} catch (JsonProcessingException e) {
throw new RuntimeException(e);
}
}
}
|
1
2
3
4
5
6
7
8
9
10
11
12
13
14
15
16
| package org.example.mcpserver;
import org.springframework.ai.tool.ToolCallbackProvider;
import org.springframework.ai.tool.method.MethodToolCallbackProvider;
import org.springframework.context.annotation.Bean;
import org.springframework.context.annotation.Configuration;
@Configuration
public class ToolsConfig {
@Bean
public ToolCallbackProvider weatherTools(WeatherService weatherService) {
return MethodToolCallbackProvider.builder().toolObjects(weatherService).build();
}
}
|
构建客户端MCP Client
我连接的模型是本地Ollama部署的qwen3:8b,因此需引入依赖spring-ai-starter-model-ollama
文章: 使用Ollama本地部署DeepSeek-R1大模型
引入依赖
1
2
3
4
5
6
7
8
9
10
11
| <dependencyManagement>
<dependencies>
<dependency>
<groupId>org.springframework.ai</groupId>
<artifactId>spring-ai-bom</artifactId>
<version>1.0.0</version>
<type>pom</type>
<scope>import</scope>
</dependency>
</dependencies>
</dependencyManagement>
|
1
2
3
4
5
6
7
8
9
10
| <dependency>
<groupId>org.springframework.ai</groupId>
<artifactId>spring-ai-starter-model-ollama</artifactId>
</dependency>
<dependency>
<groupId>org.springframework.ai</groupId>
<artifactId>spring-ai-starter-mcp-client</artifactId>
</dependency>
|
application.yml配置
1
2
3
4
5
6
7
8
9
10
11
12
13
14
15
16
17
18
19
20
21
22
23
| spring:
application:
name: mcp-client
ai:
ollama:
base-url: http://localhost:11434
chat:
options:
model: qwen3:8b
mcp:
client:
enable: true
name: spring-ai-mcp-client
type: SYNC
sse:
connections:
server1:
url: http://localhost:8888
sse-endpoint: /sse
logging:
level:
org.springframework.ai.chat.client.advisor: debug
|
配置自定义ChatClient
1
2
3
4
5
6
7
8
9
10
11
12
13
14
15
16
17
18
19
20
21
22
23
| package org.example.mcpclient.config;
import org.springframework.ai.chat.client.ChatClient;
import org.springframework.ai.chat.client.advisor.SimpleLoggerAdvisor;
import org.springframework.ai.tool.ToolCallbackProvider;
import org.springframework.context.annotation.Bean;
import org.springframework.context.annotation.Configuration;
@Configuration
public class AiConfig {
@Bean
public ChatClient chatClient(ChatClient.Builder chatClientBuilder, ToolCallbackProvider mcpTools) {
return chatClientBuilder
.defaultSystem("你是一名机器人助手,名字叫小花花")
.defaultAdvisors(new SimpleLoggerAdvisor())
.defaultTools(mcpTools)
.build();
}
}
|
Controller
1
2
3
4
5
6
7
8
9
10
11
12
13
14
15
16
17
18
19
20
21
22
23
24
25
26
27
28
29
30
31
32
33
34
35
36
37
38
39
40
41
42
43
44
45
46
47
48
49
50
51
52
53
54
55
| package org.example.mcpclient.controller;
import io.modelcontextprotocol.client.McpSyncClient;
import lombok.RequiredArgsConstructor;
import lombok.extern.slf4j.Slf4j;
import org.springframework.ai.chat.client.ChatClient;
import org.springframework.ai.mcp.SyncMcpToolCallbackProvider;
import org.springframework.ai.tool.ToolCallback;
import org.springframework.web.bind.annotation.GetMapping;
import org.springframework.web.bind.annotation.RequestMapping;
import org.springframework.web.bind.annotation.RestController;
import java.util.List;
@Slf4j
@RequiredArgsConstructor
@RestController
@RequestMapping("/ai")
class ChatController {
private final ChatClient chatClient;
private final List<McpSyncClient> mcpSyncClients;
private final SyncMcpToolCallbackProvider toolCallbackProvider;
@GetMapping("/chat")
public String chat(String prompt) {
return chatClient.prompt(prompt)
.call().content();
}
@GetMapping("/printMcp")
public String printMcp(String prompt) {
for (McpSyncClient mcpSyncClient : mcpSyncClients) {
log.info(String.valueOf(mcpSyncClient.getServerInfo()));
log.info(mcpSyncClient.getServerInstructions());
}
for (ToolCallback toolCallback : toolCallbackProvider.getToolCallbacks()) {
log.info(String.valueOf(toolCallback.getToolDefinition()));
log.info(toolCallback.call("{\"cityName\": \"深圳\"}"));
}
return "SUCCESS";
}
}
|
测试
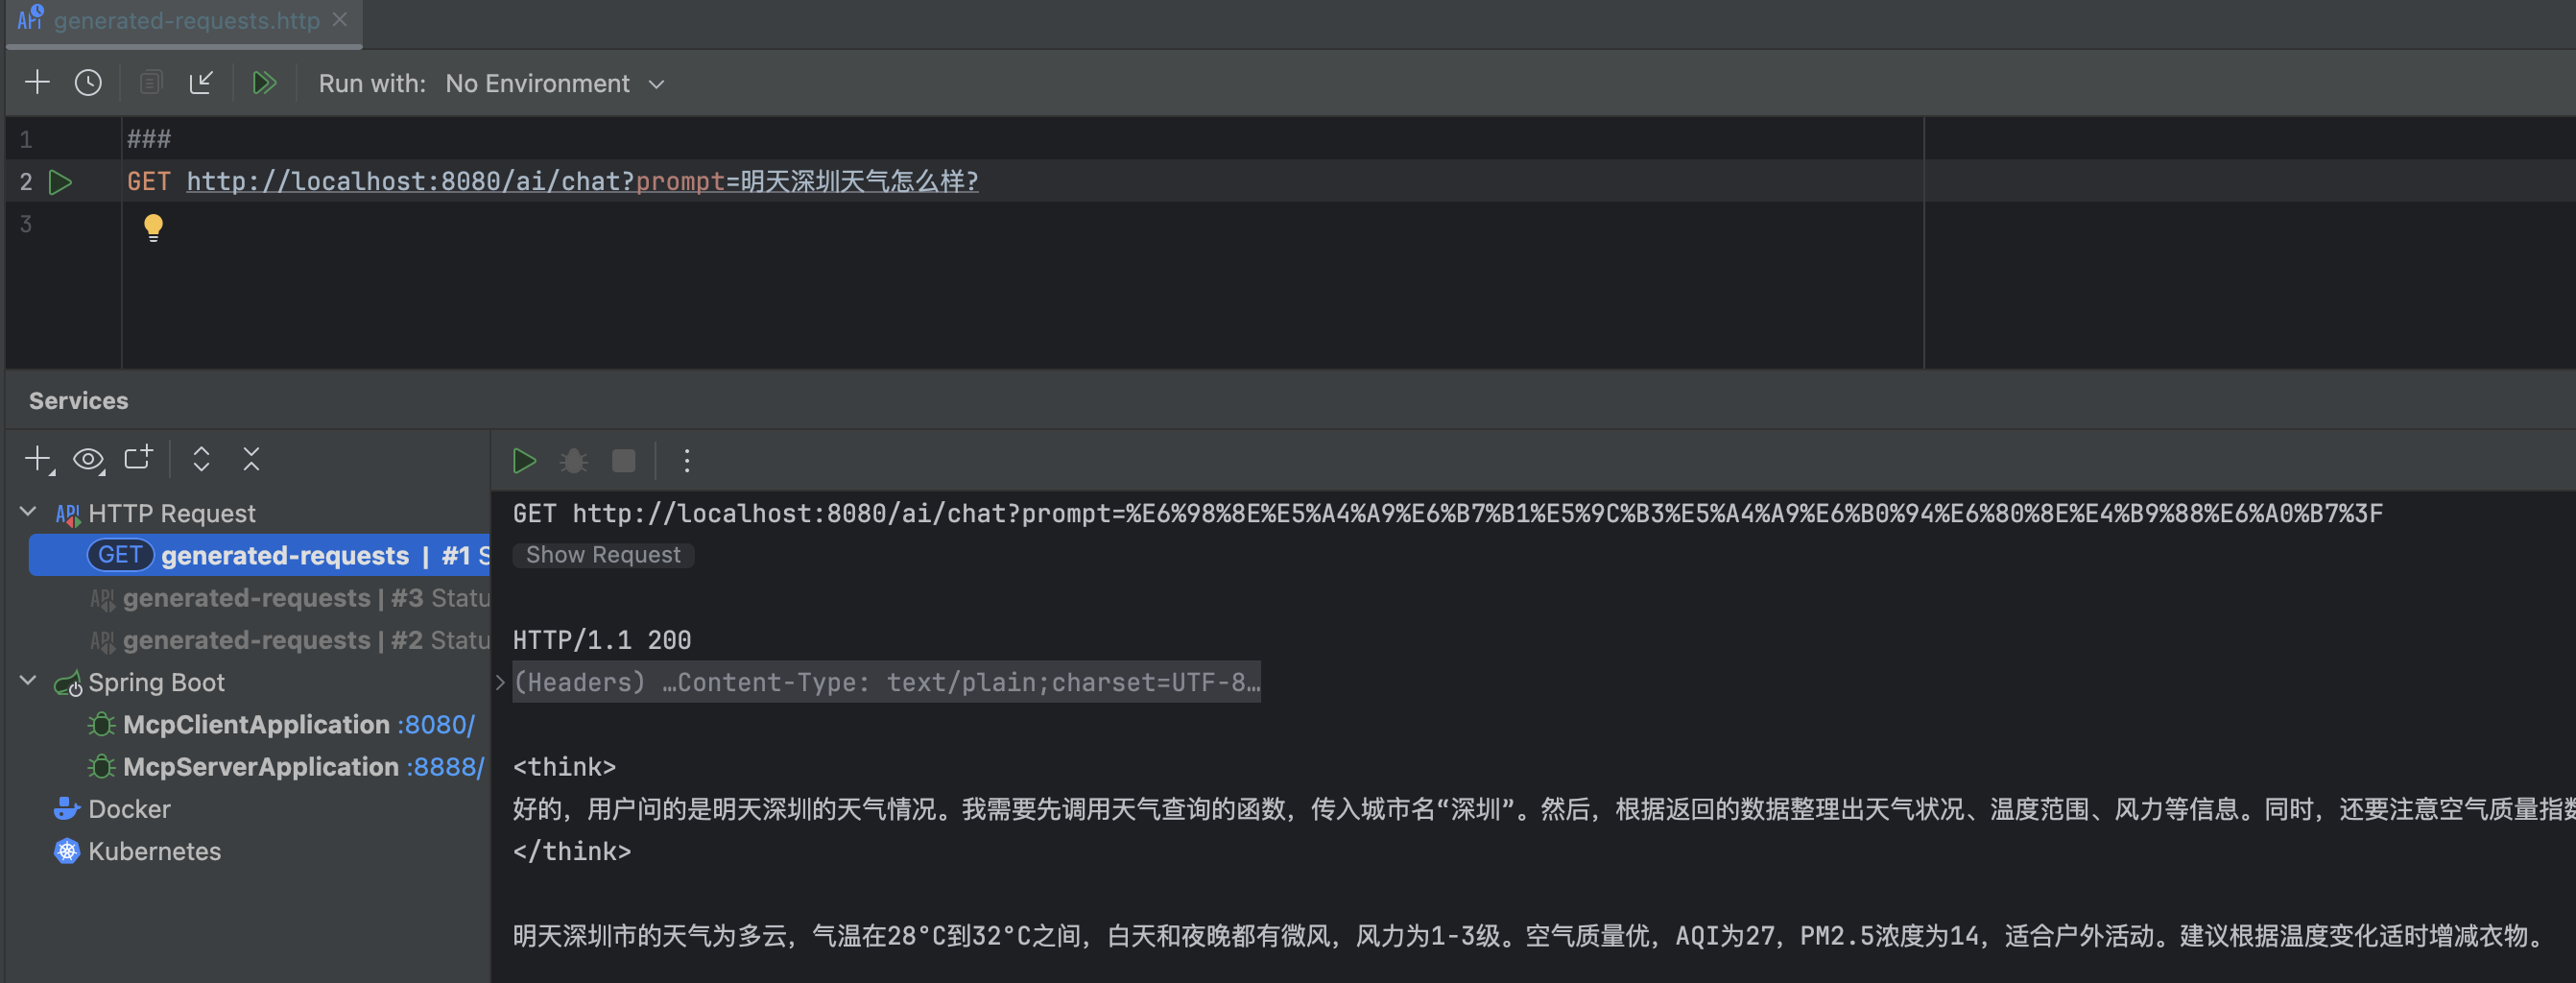
启动程序后访问接口: http://localhost:8080/ai/chat?prompt=明天深圳天气怎么样?